A few ways to transplant an orchid's baby if it sprouted on a peduncle or root

As you know, orchids breed well by planting children. When this procedure is best carried out, how to choose the right processes, what is necessary for the successful formation of the baby, what are the signs of her maturation, when to plant it properly and how then to care for?
We will also reveal the question of how to avoid problems when transplanting a baby. It will also be useful to watch an interesting and informative video on this topic.
What it is?
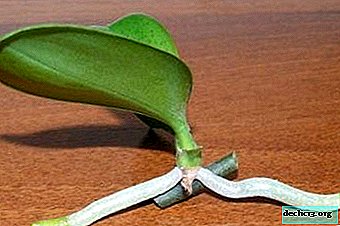
Orchid baby or process - this is a new young plant formed on the mother flower. It can have its own roots, leaves and peduncle. Sometimes children who have not yet been separated from the mother plant already begin to bloom (in detail about whether it is possible to transplant an orchid if it blooms and how to do it right, read here).
Formation Places
They may appear:
- on the roots;
- as a process on the trunk;
- on peduncles.
At first, a kidney always forms, like a small seal. And after that, a young orchid grows. Most often, children form on peduncles.
Why is it important to share with the parent?
Many beginner gardeners have questions:
- Is it worth it to plant a baby from a mother's flower?
- When and how to plant?
But be that as it may, it is possible and necessary to plant a baby from a mother's flower. Since when it appears, the load on the mother flower significantly increases. And if you do not bring the planting on time, then the orchid may fall ill or die. In some cases, if the flower has let the sprout out, the choice is made before the florist: a mother plant or a baby?
In what period is it right to plant from a flower?
If he has sprouts, then how to determine when they can be transplanted? There are several signs that the children are ready for a transplant:
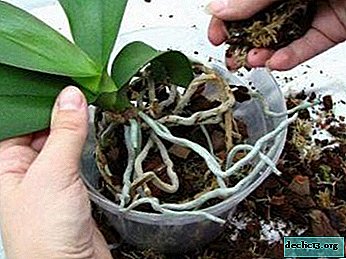
 Overgrown roots. You should not plant the baby before they form. The roots should be strong, healthy and fairly long (at least 5 cm). The more roots, the more chances to survive in a young orchid. The roots should be at least three.
- A young orchid should grow at least 5 leaves. Otherwise, her chances of survival are reduced. After all, due to the sheets, there is food from the sun, as well as plant respiration.
- The ripening time of the baby on the mother flower is 5-6 months. Do not separate them before this time.
 Overgrown roots. You should not plant the baby before they form. The roots should be strong, healthy and fairly long (at least 5 cm). The more roots, the more chances to survive in a young orchid. The roots should be at least three.
Do not rush to plant the baby. Growing roots with a young plant is a long and tedious process. It is much easier to let the baby get stronger on the mother's flower.
Preparatory work and inventory
What will be needed to separate the baby from the mother plant and transplant:
- Acute sterilized sector.
- The substrate (you can buy it in the store, but you can cook it yourself).
- Activated carbon, ground cinnamon or charcoal to disinfect the cutting site.
- A small transparent pot with holes.
- Gloves.
- Mini greenhouse (if necessary).
The substrate should be well moistened, but not wet.
Key recommendations
- No need to rush to separate the baby from the mother.
- The pot where the young orchid is placed should not be too large. You can use a regular plastic cup.
- The pot must have holes not only at the bottom, but also on the sides, so that the roots can breathe.
- You should not put a young plant in a glass of water. This can lead to decay.
- Feeding should be done no earlier than four weeks after transplantation.
- It is advisable to place a young orchid in a mini-greenhouse to maintain the desired microclimate.
Transplantation at home: step by step instructions and photos
Next, you will see the steps for performing this procedure with a photo.
This is done in several steps:
- The instrument is sterilized.
- The baby is carefully cut off from the main plant.
- Slice areas on the baby and mother flower are sprinkled with cinnamon or activated charcoal so that the infection does not get into the wound.
If she sprouted on a peduncle
How to plant a process from the base, if it grows on a peduncle:
 Using a sterile secateurs, we cut off the baby from the mother's outlet, capturing the part of the peduncle on which it grows.
- Find the base of the outlet and remove the covering flakes. Under them are the rudiments of the roots.
- Now you need to grow the roots. It should be noted that it is impossible to plant an orchid without roots in the ground!
- In this case, root growth will occur in air.
- A regular plastic cup with holes at the bottom will serve as a pot.
- Drainage (pebbles, expanded clay) is laid at the bottom of the cup. This is necessary so that the design is stable.
- Wet moss and tree bark (shredded) are placed on top of the drainage.
- Two holes are made in the upper part of the cup and horizontal support is installed on them. She will keep the appendage (if necessary, two such supports can be made).
- The baby is placed on horizontal supports so that the cut does not touch the moss (the plant hangs in the air).
- Then the whole structure should be covered with a plastic bottle with a cut bottom. She will serve as a greenhouse.
 Using a sterile secateurs, we cut off the baby from the mother's outlet, capturing the part of the peduncle on which it grows.
With this method of rooting, special attention should be paid to the microclimate inside the greenhouse. It should be very humid and warm (tropical). Of great importance is the air temperature and humidity!
You can watch the video and learn about how to separate the baby from the orchid, if she gave a sprout on the peduncle:
With roots
In this case, transplanting and rooting will be easier. To do this, do the following:
- Take a plastic cup with holes at the bottom.
- At the bottom you need to place drainage, put on top chopped pine bark, mixed with moss. The substrate should be moistened. Before transplanting, it is recommended to spill the soil with a pink solution of potassium permanganate for disinfection.
- Carefully place the baby in a cup so that the root neck is at the edge of the cup.
- Then you should fill up the substrate. This is done very carefully so as not to damage the roots.
- The roots should be completely covered with a substrate.
- You can water the plant only on the second or third day. So that the wounds from the cut would have time to heal, and the infection would not get there.
- After transplantation, cover the plant with a mini-greenhouse and maintain the required level of humidity.
Optimum substrate moisture is the most important condition for a young orchid. Soil should not be dry and at the same time too wet.
Important! Not earlier than 2-3 days after transplantation, it is necessary to carry out the first watering. During this time, the wounds after the cut will have time to heal. Thus, the risk of infection, as well as the risk of decay of the cut site, will be reduced.Possible complications
 Infection. This is fraught not only with diseases, but also with the death of plants. Moreover, both the baby and the mother plant can suffer. That is why it is recommended to sterilize secateurs and treat the cut site, as well as treat the soil.
- Decay of the cut. Prevention of this is the processing (sprinkling) of the cut site with activated charcoal or crushed cinnamon.
- The child is poorly rooted, dies. This often happens if: the shoot is cut off too early, transplantation rules have been violated, and orchid maintenance rules have not been respected.
- Sometimes a mother plant dies or is ill. This happens if several children were cut at once. In this case, the mother plant receives significant injuries. And if the infection has joined, then there is a risk of losing an orchid.
 Infection. This is fraught not only with diseases, but also with the death of plants. Moreover, both the baby and the mother plant can suffer. That is why it is recommended to sterilize secateurs and treat the cut site, as well as treat the soil.
Read more about what problems may arise after transplantation and how to deal with them, read here.
How to care after the procedure?
Watering
Watering the transplanted plant should be done very carefully with a frequency of two to three days. Water should be at room temperature.
Note! Do not allow water to enter the outlet. This is fraught with decay of the leaves. It is impossible to suppose both drying out of a substrate, and its overmoistening.When watering a baby, you need to consider:
- season;
If after two or three days the soil remains too wet, the intervals between watering should be increased.
Microclimate
 Must have a mini greenhouse. Since the baby is still very weak after transplantation, she requires careful attention to the microclimate. Namely, the greenhouse will help create it. It will help maintain moisture levels and maintain temperature. Thus, the difference between day and night temperature will not be too sharp. As a greenhouse, you can use a plastic bottle with a cropped bottom or a regular plastic bag.
A plant located in a mini-greenhouse should be aired. To do this, raise the bottle for several hours a day to ensure air access. If a package is used, then it should be ajar.
Top dressing
- A young orchid needs to be fed. But the amount of fertilizer applied should be half less than what an adult plant needs.
- Fertilizers for the most part should be mineral, it is better to refuse organics.
- If the orchid is sick or affected by pests, top dressing should be postponed.
- The soil must be moist, otherwise there is a risk of burning the roots.
- If the plant is at the stage of root and leaf mass growth, then nitrogen fertilizers should be preferred.
Conclusion
Separating and replanting the baby will not be difficult if all the rules are followed. But you should remember, an orchid is a moody flower. Manipulations with him do not always bring the desired result. Do not despair if something did not work out. Patience and practice will surely bring a howl!


-
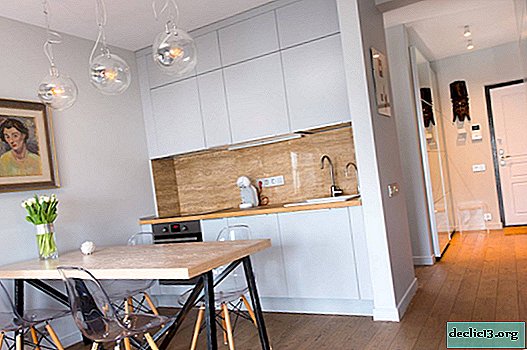
The brown living room is a symbol of stability, reliability and tranquility.
Decorating the living room in brown tones, a wide field opens up for designer creative imagination. Moreover, this shade can be used in the interiors of absolutely any style. Brown is considered natural as well as neutral with a very rich spectrum of different natural shades that bring stability and solidity to the interior. ... -

-
-