Methods of clivia propagation at home. Planting Guide

A houseplant, known as clivia, belongs to the amaryllis family (hippeastrum, amaryllis, hemanthus). Clivia differs from its relatives in the first place by the absence of an onion - instead of it, clivia has rather powerful and fleshy leaves at the base, which grow like pigtails and form a strong stem.
The tropical beauty firmly entered the category of favorites among flower growers. A beautiful plant in its unpretentiousness and adaptability to the home climate is similar to succulents. Under natural conditions, thick clivia rhizomes produce lateral rosettes and the flower easily grows in breadth.
When growing at home, the plant is propagated by seeds and shoots - these are vegetative and seed methods. In the case of clivia, the vegetative method is usually preferred.
Features of breeding at home
Shoots
- The processes suitable for propagation appear by the age of five years of the flower, after several annual flowering, when the plant has already grown abundantly.
- Not every escape baby is suitable for transplanting. It is considered ready for separation from the main plant when at least 4-5 leaves appear on the stem.
- Children grow close to the stem of the main plant or nearby, appearing directly from the root system.
- The shoot is separated after flowering is completed. The ideal time for transplanting is the first week from the day the flowering ends.
- Watering the planted shoot is done extremely carefully so as not to create excess moisture, which will lead to rotting of the root.
- Flowering occurs in the second year of the seedling separately from the adult plant.
Seeds
 This is the most troublesome option, it is used much less often.
- To obtain seeds at home, it is necessary to apply an artificial method of pollination of inflorescences.
- The ripening process takes nine months.
- A green berry appears from the flower, which gradually turns red towards the end of ripening.
- The time the seeds are ready for collection is determined by the sign that the clivia berry is soft.
- Best of all, they germinate in the first days after separation from the bush and extracting the berries from the pulp.
- Seeds can germinate provided that they are in a sufficiently moistened pulp of the berry. In this regard, the berry is cut right before extracting the seeds.
- Preparation for sowing seeds should be done immediately after collection, and after necessary manipulations, immediately begin planting.
- Seeds during ripening draw a lot of vitality from the plant. The process of creating seeds leads to a state of exhaustion.
- Therefore, it is better to purchase seeds.
- The plant is best propagated by seeds - from October to April, but it is optimal to sow until early spring.
- Flowering when propagated by seeds should be expected only after three to six years of clivia.
- Obtaining seeds is possible only from plants that are at least eight years old.
- The development of the leaf leaf, when the seedling becomes suitable for sowing, lasts about a month and a half.
- A quick option for germination is keeping the seeds before sowing in heat, wrapped in a damp cloth.
 This is the most troublesome option, it is used much less often.
The xiphoid leaves of the beautiful clivia are poisonousTherefore, hand treatment after transplant manipulations cannot be neglected, and it is best to protect the skin with rubber gloves or cotton gloves with rubber spraying. It is not permissible for a plant to enter the body, so be careful if there are small children or animals in the house.
Important! Clivia poisons cause vomiting and diarrhea.How to plant: a guide
Seed preparation
- When performing cross-pollination method in clivia, large berries are formed. Each of them contains from one to six seeds.
- They should be extracted from the berries.
- Soak in clean filtered water for 24 hours. It is necessary that the swelling of the seed material occurs.
Soil selection
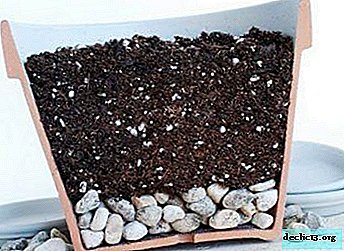 Prepare the soil for sowing seeds. To do this, take soddy soil in a volume of 2 parts, a sand component in a volume of 2 parts and add one part of peat.
- Everything is thoroughly mixed and loosened. It is necessary that the soil mixture acquire maximum friability and oxygen saturation.
- Soil disinfection is performed.
They warm the soil in a microwave at maximum temperature for a couple of minutes or in the oven for 10 minutes, or spill it with a light solution of potassium permanganate of a slightly pinkish color.
 Prepare the soil for sowing seeds. To do this, take soddy soil in a volume of 2 parts, a sand component in a volume of 2 parts and add one part of peat.
Sowing method
- Pour the resulting soil into a shallow container.
- Sow the seeds.
- Between each seed there should be a distance of a couple of centimeters.
- Seeds are not buried, they should be slightly sprinkled with earth, 3-4 mm.
- An improvised greenhouse is made from the sowing container, covering it with plastic wrap.
- Every day, the container is mandatory aired, leaving it open for ten minutes.
- Watering is carried out depending on the drying of the soil, it should not be plentiful. Gentle soil moisture needed. It is best to use a spray gun for watering.
Seedling planting
- Make a dive seedling immediately after the first leaf comes out.
- The shoot is planted and placed already in a separate pot.
- Very careful handling of the roots is required, they are very vulnerable to decay in clivia and can become ill with the slightest damage.
- The pot is taken seven centimeter in diameter. You can use a plastic glass.
- Within six months, the seedling gives about six leaves.
Follow-up care
From this moment for two years, do a transshipment of young clivia twice. Each time the diameter of the pot is increased by three centimeters.
The substrate is already taken of a different composition - to two parts of the turf add one part of peat soil, sand and humus.
Reference. The third year of life derived from clivia seeds is a mandatory period of rest, the plant is given complete rest and is not disturbed by its transshipment.During the previous couple of years, a dormant period is not required, since it is necessary to give clivia maximum time to set the volume of the root system and increase the number of leaves.
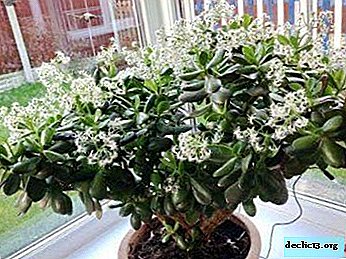
 Clivia is a fairly photophilous plant. When choosing a place, it is better to give preference to windows on the east side. But try to avoid a strong burning sun so as not to burn the leaves. The optimum temperature for clivia is about 20-25 degrees in the summer, and from October until the beginning of flowering, it is advisable to lower the temperature to 14, or even 12. Clivia will be fine, but you will have to dress warmer.
In the third year of life, expect the first flowering. If flowering has not occurred, transshipment is repeated once a year, for two years, and then rest again (why clivia does not bloom, find out here).
Vegetative way
Substrate
Take sand with medium granules and rinse. It is more convenient to do this right before the depositing process, since wet sosbtrat is required.
Shoot requirements
- Carefully cut off shoots suitable for reproduction at the base.
- To disconnect the shoot, use a sharp knife with a thin, solid blade, a serrated blade will damage the stem and make rooting difficult.
- Sprinkle with powdered charcoal the places of cuts on the main plant. You do not need to do this for the escape itself.
- Dry the shoot for half an hour in a normal indoor climate, outdoors.
Temperature and subsequent watering
- The temperature favorable for rooting of clivia shoots is from + 18ºС to + 20ºС.
- Watering should be moderate, the plant is vulnerable to decay. Ideal is to achieve easy sand moisture.
- After half an hour of drying, cut off shoots are introduced shallowly with the lower parts of the stems into the sandy substrate; sand is easily crushed around each seedling stalk with the fingers for its stability.
After that, they wait until it takes root, maintaining the necessary temperature and watering the seedlings.
Rooting
When small clivia are rooted, you need to plant them in the ground. For each take a separate pot about seven centimeters in diameter.
The soil
Parts of greenhouse, turf and leafy soil are mixed in equal proportions.
Soil disinfection is performed as described above.
Seedling care
 Plant care after planting in the soil is done according to the usual rules prescribed for clivia. In this "house" clivia grows twelve months and picks up four or six leaves.
- In the second year, clivia is transplanted into a pot with a diameter of nine centimeters. Transplantation is carried out as a transshipment method. Soil is made from equal parts of humus, peat, sand and turf. In the second year, the plant grows up to three pairs of leaves.
- In the third year of the independent existence of a seedling, they are transplanted into a pot. Requirements for a new pot - the diameter must be increased to 12-13 cm.
- Rest time will be organized by September. For this, the plant is kept at a temperature of 10-14 ° C for a two-month period. Watering during dormancy is not done.
 Plant care after planting in the soil is done according to the usual rules prescribed for clivia. In this "house" clivia grows twelve months and picks up four or six leaves.
At the end of the dormancy period, the plant is kept at normal room temperature. At this point, most likely, it should bloom for the first time in life, but flowering may occur later, in the following years.
In the fourth year, care is the same as before, but the dormant period can stretch throughout the winter until flowering stems appear. The fourth year of a seedling's life is in most cases accompanied by flowering.
More nuances about growing, including breeding and subsequent care for clivia, read in this material.
Which pot is best for the plant?
- Dishes should be taken in the form of a cylinder. From the point of view of convenience during transshipment, narrower forms are often preferred, from which it is easier to remove the plant. However, this form is required for the health and strength of the seedling itself, since the root system must develop downward and abut against the sides of the pot. That is, it is necessary to allocate sufficient space for the development of roots.
- Clay pots are usually preferred, but in the case of clivia, the owner of a fragile and vulnerable to rotting root system, it is better to take a plastic container or clay dishes varnished from the inside. It is easier to take a plant out of such a pot.
- By the way, in the case when a plastic pot is used, it can be simply gently cut during transshipment, thus maximally protecting the roots from damage and reducing the risks of root rot and leaf drying out after transhipment.
- The pot should have drainage holes to drain excess water.
The advantages of both options
Each method has its advantages, it all depends on what result you expect.
The seed method makes it possible to get many seedlings at once, but at the same time their growth time will be longer, and the flowering period later.
To save and transplant fragile sprouts is a laborious and painstaking task. To obtain seeds, you need a waiting time of about a year and special manipulations on pollination.
The vegetative method is much simpler and faster to give results in the form of a strong flowering plant.
Conclusion
If floriculture is your hobby, it will be amazing to create a beautiful clivia together with natural forces from a tiny seed. Besides on the basis of seeds you can get new varieties of flowerby crossing them.
To obtain a magnificent flower, patience and attentiveness are needed, but the more rewarding the beauty and brightness of clivia bloom will be.
Watch the video: Clivias; divide plants & grow from seed. (January 2025).


-
Forecasts for sports - where to find paid and free sports predictions from professionals for today: TOP-5 of the best sites + instructions for earning on sports forecasts
Hello, dear readers of the online magazine Richpro.ru! Today we’ll talk about sports predictions: do professionals give their predictions for free, where to find the exact and best sports predictions for today and how to make money on paid sports predictions. This or that sport is interesting to almost every person. ... -

-
-